4
Chapter 4
Creating Layouts and Pages
So far, your application only has a home page. Let's learn how you can create more routes with layouts and pages.
In this chapter...
Here are the topics we will cover:
Create dashboard routes using file-system routing.
Understand the role of folders and files when creating new route segments.
Create a nested layout that can be shared between multiple dashboard pages.
Understand what colocation, partial rendering, and the root layout are.
Nested routing
Qwik also uses a file-system-based routing system where folders are used to create nested routes. Each directory represents a route segment that corresponds to a URL segment.

You can create distinct user interfaces for each route using layout.tsx files for layouts and index.tsx files for pages.
index.tsx is a special file in Qwik that exports a Qwik component, necessary for the route to be accessible. In your Qwik application, the main file for the homepage would typically be located at`/src/routes/index.tsx` - this file is associated with the `/` route.
To create a nested route, you can nest folders within each other and add `index.tsx` files inside them. For example, by adding a folder called dashboard, you create a new route `/dashboard`.

`/src/routes/dashboard/index.tsx` is associated with the`/dashboard` path. Let's create the page to see how it works!"
Creating the Dashboard Page
To create a new dashboard page in Qwik, start by creating a new folder called `dashboard` inside `/src/routes`. Then, create a new file named `index.tsx` within the`dashboard` folder with the following content:
Ensure that the development server is running and visit http://localhost:5173/dashboard. You should see the text "Dashboard Page".
This is how you can create different pages in Qwik: create a new route segment using a folder, and add an `index.tsx` file inside it. This defines the page content for that route.
Qwik also allows for the colocation of UI components, test files, and other code related directly beside your routes in specific folders. Only the content inside the `index.tsx` file will be publicly accessible. For example, the `/components ` and `/lib` folders can be colocated inside the `/src` folder alongside your routes.
Practice: Creating the dashboard pages
Let's practice creating more routes. In your dashboard, create two more pages:
- 1.Customers Page: The page should be accessible on http://localhost:5173/dashboard/customers. For now, it should return a
<p>Customers Page</p>element. - 2. Invoices Page: The page should be accessible on http://localhost:5173/dashboard/invoices
Spend some time tackling this exercise, and when you're ready, expand the toggle below for the solution:
Creating the dashboard layout
Dashboards typically have navigation shared across multiple pages. In Qwik, you can use a special `layout.tsx` file to create a UI shared between multiple pages. Let's create a layout for the dashboard pages!
Inside the `src/components/ui/dashboard` folder, add a new file called `nav-links.tsx` and paste the following code:
Here are some key points about this code:
- Importing the icons: The
`@qwikest/icons/heroicons`package provides a set of icons you can use in your application. - Creating a map of links: The
`links`array contains the navigation links to display in the side navigation. - Rendering the links: The
`NavLinks`component maps over the`links`array and renders the navigation links.
Next, let's create a `SideNav` component that will use the `NavLinks` component to display the navigation links.
Inside the `src/components/ui/dashboard` folder, add a new file called `sidenav.tsx` and paste the following code:
Here are some key points about this code:
- Importing the components: The
`NavLinks`component is imported to display the navigation links. - Rendering the side navigation: The
`SideNav`component renders the side navigation with the logo, navigation links, and sign-out button.
Now that you've created the layout components, let's add them to the dashboard layout.
Inside the `/dashboard` folder, add a new file called `layout.tsx` and paste the following code:
Here are some key points about this code:
- Importing the
<SideNav />component:: Any component you import into this file will be part of the layout. - The
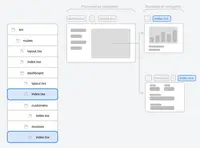
<Layout />component receives a`Slot`, which acts as a placeholder for child components. In your case, the pages inside`/dashboard`will automatically be nested within a<Layout />like so:

Ensure everything is working correctly by saving your changes and checking your localhost. You should see the following:

Benefit of using layouts in Qwik: During navigation, only the page components update while the layout doesn't re-render. This is known as partial rendering:

Root layout with Qwik
In the previous chapter, you learned how to integrate global styles and configure essential elements that affect the entire application. This sets the stage for understanding the role of the `root.tsx` file in Qwik, which serves to globally configure the application and anchor all pages and components.
This `root.tsx` file is crucial as it ensures that any UI added will be shared across all pages of your application. You can use this file to modify the <html> and <body> tags and to add metadata, which you will learn more about in a later chapter.
As the specific layout you created for the dashboard (`/src/routes/dashboard/layout.tsx`) is unique to the dashboard pages, it is not necessary to add any UI to the root layout mentioned above.
It’s time to take a quiz!
Test your knowledge and see what you’ve just learned.
What is the role of the layout.tsx file in Qwik?
Congratulations, you have learned how to create layouts and pages in Qwik! 🎉
Recommended reading
Explore further insights on these themes. If you're keen to deepen your knowledge, the resources listed below provide valuable information:
Source code
You can find the source code for chapter 4 on GitHub.
📺 Chapter 4 Video Walkthrough
RumNCode 🥃 walks you through this chapter, reinforcing key concepts from previous sections and adding new ones. This chapter is presented by RumNCode 🥃, a Qwik Hero from the official Discord community.
You've Completed Chapter 4
Well done! You've learned how to create layouts and pages in Qwik.
Next Up
5: Navigating Between Pages
Learn how to navigate between dashboard pages in Qwik.
https://github.com/DevWeb13/learn-qwik/issues/23